Important Features of the Rotovap
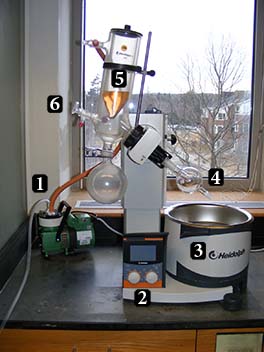
1) The vacuum pump is the source of reduced pressure in the system.
2) Spin speed and bath temperature control knobs.
3) Water bath.
4) Bump guard.
5)Cold finger. (Please do not use the rotovap if the finger is not cold. There should be excess solid dry ice in the finger.)
6)Vacuum release valve.
The rotovap should be turned on and the trap cooled. If this is not the case, ask your TA for assistance.
1. Attach your flask to the bump guard of the rotovap using a Keck clip. The flask should not be more than half full of liquid.
Notice that the Keck clip has larger and smaller sides to accommodate the larger neck of the round bottom flask and the smaller stem of the bump guard.
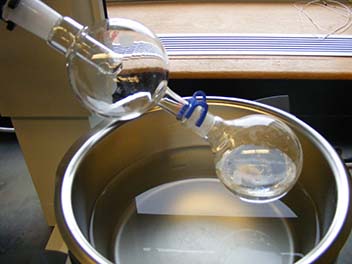

2. Turn on the spin. (See left photo marker #2.) This will help prevent bumping during the distillation. Ask your TA if it is appropriate to turn on (or up) the heat to the bath.
3. Push down on the knob (marker #1, left photo) and slide the knob to the left to lower the flask into the water bath. The liquid in your flask should be below the level of the water in the bath, but the neck of the flask should be above the water line and the bump guard should not be rubbing the water bath..
4. Turn on the vacuum pump by flipping the switch on the pump to the ON position.
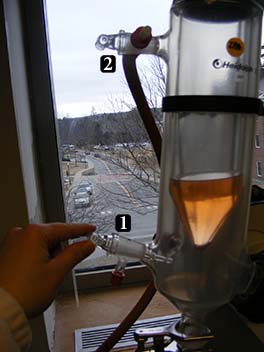
5. Close the stopcock (marker #1, right photo) to create a vacuum inside the rotovap. Stopcock #2 (right photo) should not need adjustment. Stopcock #2 should be open to the vacuum pump.
6. Within a minute or so you should see vapor condensing on the cold finger and collecting in the collection flask. If you do not, please ask for assistance sooner rather than later, especially if a line is developping for the rotovaps.
7. To remove your sample, (a) release the vacuum by turning the correct stopcock (marker #1, right photo.) (b) Turn off the vacuum pump. (c) Stop the spinning and raise your flask. (d) Once the pressure has equilibrated, THEN remove the Keck clip and take your flask.